|
|
Growing Irises from Seed |
If you are hybridizing, you will necessarily be growing irises from
seed. There are other reasons to use this method of propagation as
well: to acquire plants not otherwise available, to economize, to
raise genetically diverse forms of a species, to select forms adapted
to your growing conditions, to obtain virus-free stock, or just for
the satisfaction of growing a new plant from seed to
bloom.

Growing Irises from
Seed
If your experience raising plants from seed is limited to planting a vegetable garden or some flowering annuals from the seed-packet display at your local garden center, the process of growing irises from seed may be an unfamiliar one. If you research the subject, you will find a variety of different procedures recommended by different enthusiasts, some of them dauntingly complex. I hope this short article will give a clear picture of the process and its possible variations.
There are two requirements for germinating iris seeds:
1. They must experience several months of cold temperatures, followed by a warming period.
2. They must have adequate moisture.
The simplest way to meet these two requirements is to plant the seeds outdoors in the autumn or early winter, and let nature take its course--assisting with supplemental water if natural precipitation is insufficient. Seeds can be planted straight in the soil, or in pots sunk into the ground. A planting depth of 1 cm or 1/2 inch is suitable for most seeds. Germination usually occurs around the time of iris bloom in the spring.
Some growers prefer to give the seeds their cold treatment ("stratification") indoors, by putting the seeds in baggies with slightly moist vermiculite, perlite, or other sterile medium and refrigerating them for 60 days or more. The advantage of indoor stratification is greater control over the conditions, and the possibility of getting germination a few months earlier. The disadvantage is that you need to be prepared to grow on the seedlings indoors under grow lights for some time, until they are ready to be hardened off and planted outdoors.
I prefer the outdoor method, as it is less bother and easier to manage with large numbers of seedlings.
Whatever method is used to germinate the seeds, they should be transplanted to a semi-permanent seedling bed outdoors when they have at least three leaves. Some may bloom a year later. The year after that, most should bloom and you can decide which ones to keep and which to discard.
The reason the period of cold temperature is needed is that irises, like many perennials from temperate climates, cannot easily survive a winter while still small seedlings. When germination occurs in the spring, rather than in the fall, the young plants have the best possible chance of survival. In contrast, most annuals are fast-growing, opportunistic plants that can grow, flower, and produce seed whenever there is a few months of warm weather.
Even if the requirements above are met, not all the seeds will sprout the first year. With garden variety bearded irises, the percentage will usually be more than 50%, and can approach 100%. Most of the remainder will sprout the following year. At the other extreme, aril irises may sprout a few at a time over a period of 10 years or more. Why is this? It is nature's "insurance policy" against calamities and harsh conditions of various sorts. If all seeds sprouted at the same time, a drought, flood, fire, or other disaster could destroy the whole population. By having the seeds sprout over the course of several years, it is virtually guaranteed that some will survive.
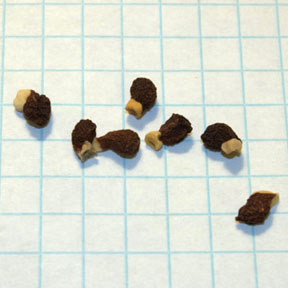
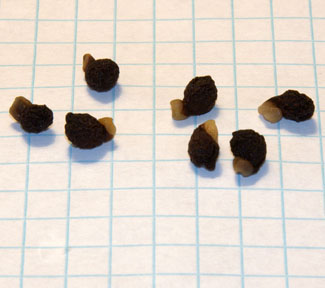
For the gardener, however, such protracted dormancy is a frustration. Few of us want to wait a decade for the seeds we plant to sprout! In irises, dormancy has at least two causes: the hardness of the seed coat, which makes it mechanically difficult for the seedling to emerge, and chemical germination inhibitors inside the seed itself. In nature, the action of water and the cycles of freezing and thawing serve to gradually weaken the seed coat and to leach away the chemical inhibitors.
Some growers have success by planting seed fresh, before it has a chance to dry out. For some types, at least, this can bypass dormancy and result in immediate germination. Of course, one then needs a way to care for the seedlings over winter.
A variety of techniques are used to overcome dormancy artificially. One can attempt to leach out the germination inhibitors by prolonged soaking or use of running water. One can overcome the hard seedcoat by abrasion or chipping (cutting away the seedcoat to expose the embryo). This "forced germination" procedure is often recommended for difficult oncocyclus seeds. (See this excellent thread in the SRGC forum for a description of the procedure with photographs.) The ultimate procedure is to excise the embryo under sterile conditions, and germinate it on a nutrient agar medium. This "embryo culture" can be used to germinate seeds that will not germinate any other way, but it is very demanding work and the young seedlings are very vulnerable.
Whether you choose to use any of these techniques for overcoming dormancy will depend on whether the basic method is giving adequate germination for the types of seeds you grow. I think the best advice is to try natural germination first, and then move on to progressively more invasive and difficult techniques if you need to.
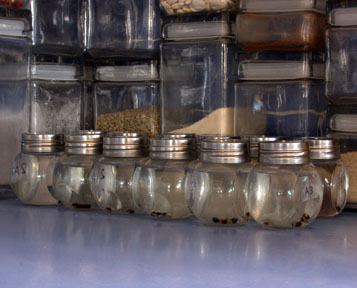
I soak my seeds for four to five days in cat-proof little jars, changing the water daily. The main purpose of this is to ensure that the seeds are fully hydrated. I live in a dry climate, and I think it is important to give them this head start in regards to moisture. The water changes may help the leaching out of the chemical inhibitors, although I do not know if this is very effective or not. (The published experiments on leaching kept the seeds in flowing water for many weeks.) It seems an easy enough thing to do, however. It does no harm and may give some benefit. The week time period is arbitrary. It is certainly long enough to fully hydrate the seeds, and it fits my schedule. (I do most gardening on the weekends.)
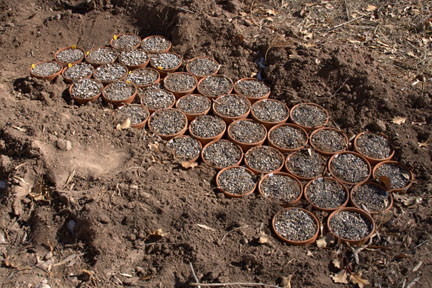
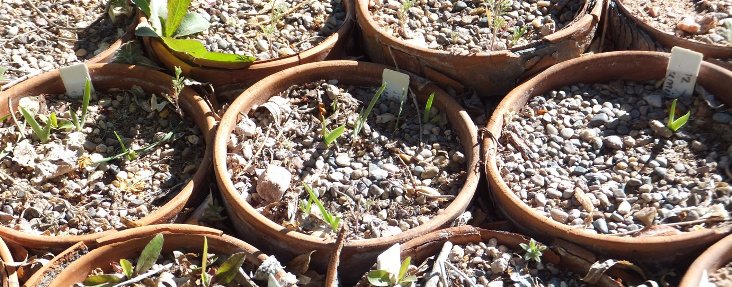
After the soak, the seeds are planted in potting soil (seed-starting mix, which I sometimes mix with sand) in 5-inch clay pots, with a maximum of about 25 seeds per pot. These are covered with a single layer of small gravel and set into the ground outside. The gravel is intended to discourage cats and birds from molesting the pots, inhibit growth of moss and mold, and hold the soil in place in case there is flooding. I use pots instead of planting in the open ground so that I do not have to worry about ungerminated seeds remaining in the soil and sprouting later.
I plant after the first frost in autumn (October here). Seeds from seed exchanges often arrive in December, January, or February, so they are planted later.
My plans are to leave the pots in place for two years (four years for aril seeds). This seems a reasonable compromise between getting a larger number of seedlings and conserving garden space and labor.
For a video explaining and demonstrating my planting method, see this Telperion Oasis blog post.
When the seedlings are all at the three-leaf stage, they can be lined out in a seedling bed. I've experimented with transplanting in the spring and waiting until August, when our monsoon rains begin. Neither timing is ideal, but earlier seems to better, provided I flood the seedling bed regularly. The seedling bed should be designed so it can be watered amply as needed. (Even arils, which normally will go dormant during summer and want to be kept dry, will stay in active growth in the seedling stage and appreciate the water.) The seedlings are lifted out of the pots with a fork and placed in a tray of water. If the seed is still attached, it should be left with the seedling. It is important that the seedlings not dry out during the transplanting process. A spacing of 9 inches between seedlings is sufficient for a seedling bed to be kept for 2 years.
I keep maps both of the seed pots and of the seedling beds; it is unwise to rely solely on physical labels.
When obtaining seeds from commercial sources or seed exchanges, there is a certain risk that the seedlings will not be true to name. In addition to the possibility that the plants from which the seed were collected were not identified correctly, there is the risk of cross-pollination with other irises in bloom at the same time. Sometimes the person growing the seed will hand pollinate the blooms, but often seed is just collected from open pollinated blooms. If the seeds are collected in the wild, they will probably be true to the species they were collected from: habitats and bloom times of irises species do not usually overlap in the wild. Garden collected seed is more likely to be true if the species blooms earlier than others (I. pumila) or if the grower has only a few different species of iris. This is not meant to discourage the ordering of open pollinated seed - it is more likely than not to be true to name. It is, however, wise to confirm the identification of seedlings against a published description of the species or variety before using the seedlings in hybridizing or distributing them.
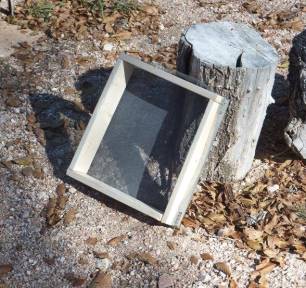
This method has given me only spotty germination so far. Furthermore, the clay pots do not hold up well to repeated freezing. I expect the poor germination has more to do with difficult weather conditions as much as anything else, but I decided to try a new planting method in 2013. The best germination I've had with irises was when I planted the seeds directly in the ground in Las Cruces in the 1980s. To try this here, but without leaving ungerminated seeds in the ground forever, I built a small wood frame with a mesh bottom and set it into the ground. I made the mistake of putting rows too close together without dividers, which may lead to some mixing of the seeds if there is a heavy rain (an uncommon over winter in this part of the world!). It will be interesting to see this method offers any improvement over the pots.
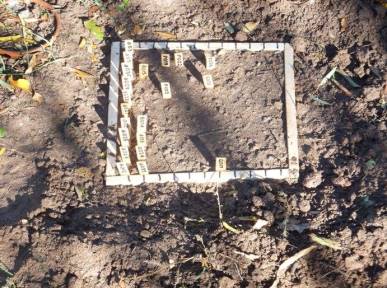
I got good germination from in these frames, which I used for two years, but I did not care for the lack of control in keeping crosses separate and being able to discard or move individual crosses as needed in subsequent years. I now use square plastic pots, large ones (5 inches square and equally deep) for most crosses, and small ones (3 inch) when I have just a few seeds.
I found it impossible to maintain a rigid schedule for how long to keep seeds before discarding them. Species seeds have usually given no germination at all the first year, some the second, some more the third, and so on. Crosses with garden hybrids as one or both parents generally germinate well the first and second year. The weather during any given winter and spring also has a major impact. So I decide what to do case by case. If I have all the seedlings I think I need from a given lot of seed, I will discard them. Otherwise, I keep them and continue waiting for more.
December 2010
updated November 2017
|
|
Unless otherwise noted, all text and illustrations copyright Tom Waters and all photographs copyright Tom or Karen Waters. Please do not reproduce without permission.